 Theta Tau | UIUC
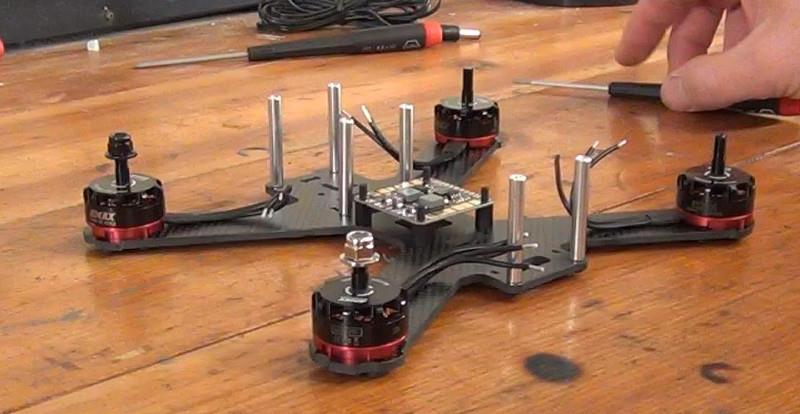
Kappa Quadcopter
Theta Tau is a professional engineering fraternity, and our Projects committee makes a project for Engineering Open House each year. Our pasts projects include a robotic claw, mini tesla coil, interactive ferrofluid, and a catapult among others.
Project Overview
Objective
The average human’s peripheral vision is so limiting. Why not put on some goggles and pretend you’re flying, all without moving an inch? Over the past few years, drones have become more and more accessible to amateur builders.
The objective of this project is to design, construct, and program a FPV racing drone that will challenge the limits of man’s current technological capabilities. With the current low cost of electronic parts and wide array of choices available for drone components and open-source firmwares and softwares, we have many different options at our disposal.
Background
Drones have been around for years, recently becoming wildly popular with FPV racing competitions as well as engineering students who use them for videography and general fun. Recently, China even launched the world’s largest drone, capable of carrying up to 1.5 tonnes [1]. With the capabilities of drones expanding, it is easy to see how their impacts will rapidly expand into other industries, whether it be package delivery, search and rescue, or security [2].
High Level Goals
- FPV Drone operates within 300m range of user
- User HUD of drone flight metrics and positioning
- Tracking of people/objects using open source libraries
- Program drone to do pre-selected tricks (ie: flips, loop, etc)
Design Overview
General Drone Block Diagram

Project-Specific Block Diagram

Processing Subsystem
Flight Controller (FC)
The flight controller acts as the “brain” of the FPV. It receives input from the user via the RX/TX and controls the flight of the drone, mainly the motors, in response to our input. We opted for the Acro 6, due to its compatibility with CleanFlight, our software of choice to program the flight controller, along with the rest of the parts of our drone.
Communication Subsystem
Radio Receiver (RX)
The purpose of the radio receiver is to capture the signals from the radio transmitter (our controller) and turn those inputs into movement for the drone. The receiver that we chose for this project is capable of receiving signals from the transmitter in excess of 300m away, and gives us plenty of room to race the drone without the connection dropping. It is also very light, weighing only 4.5 grams, contributing very little overall to the weight of the drone.
Radio Transmitter (TX)
For the transmitter we decided to invest in quality and selected a Flysky 2.4Ghz transmitter capable of sending signals to our receiver through its entire 300m range. It utilizes two 26mm antennas to sustain this connection, and is sensitive all the way to -105 dB. In addition, it has multiple throttles and is very user-friendly.
Video Transmitter (VTX)
The video transmitter take the video feed from the FPV camera on the drone and sends it to our FPV goggles. For the video transmitter, we went with the Eachine VTX03. We decided to go with this for a few reasons - the main one is the bang for the buck that we get with this $14 piece of hardware. It will provide us with the flexibility to easily change the power consumption settings to with the simple press of a button, to easily test the setting that works with our drone. Along with the simple interface, we can choose between multiple video transmission protocols and ensure connection through its 5.8 GHz channel.
Imaging Subsystem
FPV Camera
This camera is designed to capture an image in front of the FPV quadcopter for the VTX to pick up and send to the googles. This model has 110 degrees of view - a good mix between having a wide enough view to be aware of the surroundings without losing detail. It is lightweight and small in size at only 10 grams, so there won’t be any trouble fitting this camera to the frame and wiring it to the transmitter.
FPV Goggles
The FPV Goggles are used to receive the video feed that is being sent from the FPV camera mounted onto the quadcopter. We chose the google set we are using since it is compatible with the wireless frequency that the VTX is sending the video over. We also chose to use this set due to its long two and a half hour battery life, meaning that we can take the quadcopter out for extended periods of time and not have to worry about being able to see the location of the quadcopter.
Power Subsystem
Power Distribution Board (PDB)
The PDB is responsible for converting voltage and current from the batteries to safe values for the various components of the drone. The batteries output 14.8 volts and are able to source large amounts of current as required by the ESCs to drive the motors, so the PDB needs to regulate this battery input and provide several different power lines for consumption. The PDB also contains short circuit protection to avoid damaging the batteries and causing hazards.
LiPo Battery
For our battery we have chosen to go with a four-cell, 1500mAh battery. This is ideal because considering our weight and propellers, the motors would require a battery that can discharge at over 100 Amps for the drone to travel at our desired speeds. With a 100 C-rating, our battery has a discharge rate of 150 Amps, which is more than enough. This battery weighs 191 grams, so it is slightly heavy but we expect the payoff in speed to be well worth it.
LiPo Charger
We chose the Turnigy Reaktor 250W LiPo charger for our lipo batteries. This charger can provide up to 10A charge rates accurately and can balance charge each of the 4 cells in our battery. It is also an all-in-one battery so if we decide to change our battery type in the future, then we can still use this charger.
Electro-mechanical Subsystem
Electric Speed Controller (ESC)
The ESCs are essential for regulating the current that goes to the motors, allowing us to adjust the speed that each motor spins at. They connect to the PDB and microcontroller. The PDB provides the current from the battery and the microcontroller tells the ESC how fast it wants the motor to spin.
Motor
The “KV” of a motor determines the rotations per minute of a motor. The KV is set by the number of copper windings around the stator [5]. The motor we selected is a 2300KV motor, along with our 14.8 V battery, will spin at 34040 rotations per minute. This speed will decrease due to air resistance when a propeller is mounted on, but should still be fast enough to carry all the components we put on the frame.
Additional Components
Frame
As the frame is the skeleton of the drone, it needs to be strong enough to hold all the other components while also being strong enough to withstand any collisions and falls. Our frame is made of carbon fiber, a material with higher tensile strength, higher stiffness, and lesser weight than other options. The frame’s shape is named Hybrid-X, with the X-frame’s arm angles combined with the H-frame’s long body, affecting how thrusts are applied on the frame. [4]
Propellers
The propellers of our drone contribute to using the spin of the motors to keep the drone in the air. There are different blade amounts on propellers which handle the power supplied to the propeller differently. Engines with larger horsepower require more blades on the propeller. Currently, there are four blades on each propeller of our drone.

Presenting at EOH
Engineering Open House is an annual student-led event featuring two days of exhibits and competitions that showcase the work of engineering students at the University of Illinois. We had a lot of fun presenting at this event. We met many children with an interest in drones who were very fond of ours!

Projects Committee Team
Chris Rioux , Akhil Chainani , Rishab Pohane , Arushi Agarwal , Jose Lopez , Kamil Nocon , Kanchi Shah , August Gress , Michael Shea , Julia Fiorino , Matthew Daniel
References
[1] https://www.vanguardngr.com/2018/10/china-launches-worlds-largest-drone/
[2] https://www.microdrones.com/en/industry-experts/